Using Python to send Open States API data to Google Fusion Tables and make a legi mashup map.
Published 2012-03-03
UPDATE: User found a couple senators didn't have photos, which removes 'photo-url' from the dict. "I added a check for the key before writing and that fixed it. Reminder to anyone who tries this to check what info your state has available before starting in."
Nearly three weeks ago I talked about feeding data from Sunlight’s Open States API to Google’s Fusion Tables to make a legi mashup map if only because it’s possible.
I’m happy to say not only is it possible, but it came together rather quickly, especially thanks to a previous walkthrough from John Keefe and a Fusion Tables Python library written by FT team member Kathryn Hurley.
Now, no doubt are there are more efficient ways to make this map happen, and even avoid Python all together. But at this stage of my abilities – pretty solid on basic Google Maps and Fusion Tables javascript API, and beginner Python – I’m a bit of a “I wonder if I can pull this off guy,” and I think this works well. It can definitely be within the wheelhouse of “intermediate to advanced beginners” and help you level up.
What We’ll Do
We will query Sunlight Labs Open States API for Wisconsin State Senator information using a Python Library and write it to a csv.
We will then upload & sync the csv to Fusion Tables using a Python script. We will merge that Fusion Table with Wisconsin State Senate district shapes and create a map that allows a user to enter their address and find their state senator.
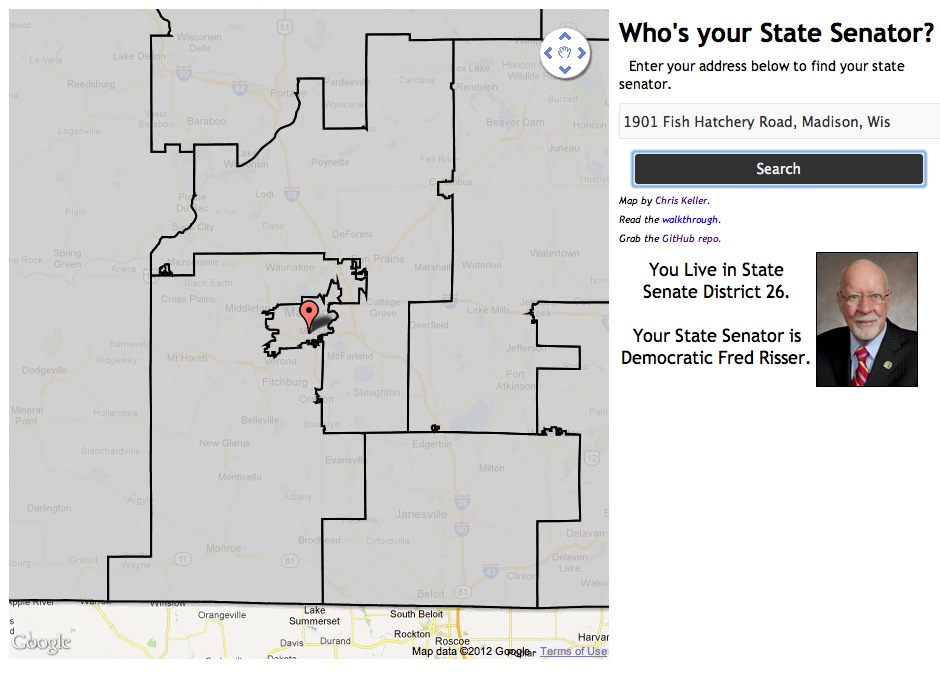
You can see the end result here. The GitHub repo -- with the code to make this happen -- is here.
Starting out
To start, we’ll need a couple things…
- A Sunlight Labs API key, which you can get via email in about 10 minutes.
- A Google Docs account.
- The sunlight Python library and the ability to run Python scripts, which should be easy for non-Windows users. For Windows users, here are some notes I made from a couple of walkthroughs that got me up and running on a machine.
- Shapefiles for your state senate districts, which can be found from TigerLine under the option for Upper Chamber. Once you download the zip file, you can upload it to Fusion Tables using Shape to Fusion, aka shapescape
Step 1
Let’s start with the setting the API key and installing the sunlight Python library.
Fire up your terminal and enter the following:
echo "YOUR API KEY BETWEEN THE QUOTES" > ~/.sunlight.key
Then using the python package installer pip you can install the Sunlight library.
pip install sunlight
However, pip doesn’t come with a default Python installation, so if you receive an error when you type in the command above, you can install setup tools first, which will give you access to the easy_install package manager.
Then it’s a matter of using easy_install to grab pip, and pip to grab sunlight.
easy_install pip
pip install sunlight
Step 2 (Create a Fusion Table)
Now we’re going to want to create our Fusion Table, because we’ll need to know the column headings and we’ll need the table ID.
I’ve found the easiest way to do this is to create a Google Spreadsheet and then import that to Fusion Tables. As for the column headings, I grabbed a list of the available Open States data to use the basis, though I ran into some issues with some of the fields that I’ll explain later on. I also added a GEOID column which I will use as the key column when it comes time to merge this with the shapefile. You can see my Fusion Table here.
Once you have your Fusion Table, you will be able to find the table id by going to File –> About in the Fusion Tables interface.
Step 3 (Python)
If you grabbed the GitHub repo I created, you’ll find that the sunlight-ft-python directory contains several Python scripts. We’re concerned right now with:
- data_search.py: This searches Sunlight’s Open States api and write the data to legi.csv
- data_import.py: This uses authentication to sync the data in legi.csv file to the Fusion Table you created.
In the first part of data_search.py, we’re importing the sunlight library and Python’s csv writer. We’re then setting our search variables – wisconsin and upper chamber in this case – but we could have easily just adding them in the next section. I pulled them out just to make them more obvious.
#import libraries
import sunlight
import csv

#variables for the search
state_name = "wi"
chamber_name = "upper"

#pull API data
legis =  sunlight.openstates.legislators(
    state=state_name,
    chamber=chamber_name,
)
In the second part of data_search.py, we’re opening an csv file to write to and then looping through the data that is being returned from the API.
I’m checking to see if the district number being returned is a single-digit district or a double-digit district. If it’s single I’m adding an extra zero to the GEOID designator. If it’s double, it only gets one zero. This is the column I will be using to merge my Fusion Table with the shapefile. There are many ways to pull this off, and you may have a better solution.
The information contained within writer.writerows match column headers of my Fusion Table. And after each step of the loop, I’m writing the information to the csv and closing the file.
#open csv writer
writer = csv.writer(open('legi.csv', 'wb', buffering=0), delimiter=';', quoting=csv.QUOTE_ALL)

#open loop
for legi in legis:

    geo_pre = legi['district']

    if len(geo_pre) == 1:
        item = "5500"

        #write csv rows
        writer.writerows([
            (item + legi['district'],
            legi['full_name'],
            legi['last_name'],
            legi['first_name'],
            legi['middle_name'],
            legi['photo_url'],
            legi['state'],
            legi['chamber'],
            legi['party'],
            legi['district'])
        ])

    elif len(geo_pre) == 2:
        item = "550"

        #write csv rows
        writer.writerows([
            (item + legi['district'],
            legi['full_name'],
            legi['last_name'],
            legi['first_name'],
            legi['middle_name'],
            legi['photo_url'],
            legi['state'],
            legi['chamber'],
            legi['party'],
            legi['district'])
        ])
To run this, fire up your terminal, cd into your directory and run
python data_search.py
You should see a file titled legi.csv in the directory and hopefully is has data in it? If so, we’re now ready to work with data_import.py.
There is really only one thing we need to do here, and that is adjust the column headers. Towards the bottom – line 37 or so – you’ll find the following:
cols = ["GEOID",
  "full_name",
  "last_name",
  "first_name",
  "middle_name",
  "photo_url",
  "state",
  "chamber",
  "party",
  "district"]
Here is where we define the columns we want to push to Fusion Tables and sync.
Once that’s adjusted, head back to the command line and you will use the following, adding in your Google docs account, the name of the csv file – legi.csv – and the ID of your Fusion Table.
python data_import.py [google account username] [csv file] [fusion table id]
If all goes well, you will be asked for your Google account password and you will see each column being written. The script is set to update the table every two minutes, and since we don’t really need that, you can press CTL + C once everything is successful. You’ll know because your Fusion Table will be populated with brand new data.
Step 4 (Merging with your shapefile and making your map)
I won’t spend too much time here on this step because there are several walkthroughs available; I have a list of some here. But by all means, should you have questions or suggestions, don't hesitate to let me know.
Anyway, from here we’ll just merge our two Fusion Tables together – the table with the data and the table that contains the shapefile you uploaded. Save the resulting map, and use either the iframe embed method or Fusion Tables Layer Builder to add your map to a HTML page.